Wednesday, September 5, 2012
Experiment 24 - The Selection
It's after Labor Day, so in addition to putting away my seersucker and white shoes, I figure it's time to get back to this blog full-time. Not that the weather where I live isn't still conducive to outdoor chores, but I've still got a jillion recipes to choose from.
But for this week, I'm going to go with something I saw posted by a friend on Facebook. I guess I can just go ahead and post the link, and then I won't even have to transcribe the ingredients.
I'll just make it short and sweet then, with this link to Puerto Rican pork and beans --
Come back in a few days to see how it turns out.
Monday, August 6, 2012
Experiment 23 - Tex-Mex Mini Ravioli Soup
Ingredients list
Taking a month off made me forget that I was supposed to take pictures along the way as I prepared my recipe. Also, the whole working outside in the blistering heat made my brain soft. So there's a photo of the soup cooking, and one of the soup served. Most everything came in cans and packages anyway, so there wasn't much to see.
As hinted at by the title of the column I had saved - "Desperation Dinners" - the emphasis was on easy and quick. So here we go.
Heat the oil over medium heat in a soup pot or Dutch oven. The recipe says to use a 4 1/2 qt pot, but I had a relatively new 3 1/2 qt Dutch oven, so that's what I used. Not like I was going to go out and buy yet another one. Peel and chop the onion and add it to the pot. Stir for a couple minutes until the onion starts to soften up, then add the broth, salsa, corn and ravioli. Turn up the heat and bring to a boil. In the meantime, rinse and drain the beans, then add them to the pot. Boil for about five minutes until the ravioli is cooked, then take off the heat and let it sit for five minutes.

Serve in a bowl with a dollop of sour cream, if desired.

Verdict - Desperation dinner indeed. I'd have to be desperate to make this again. The soup part was alright, but I couldn't get past the ravioli, It just tasted like ravioli, and therefore was out of place. Another problem for me was the lack of seasoning. I suppose the writers figured that using salsa would take care of most of that, but I needed more. I even added some ground chipotles that I had in the cabinet, but that wasn't enough. The fast cooking time didn't help either, and I purposefully waited until I'd had leftovers twice before posting this, hoping that maybe the flavors would meld as the pot sat in the refrigerator - like chili the day after No such luck.
Lessons Learned - go ahead and add spices and seasoning, even if not explicitly called for..
Tools needed - nothing new this week.
Skills needed - nothing at all.
Wednesday, August 1, 2012
Experiment 23 - The Selection
Hey, I'm back. Summer, busy, yada yada yada.
I found today's recipe selection in a pile of papers in my home office. I'm trying desperately to get that room spotless for when my family visits in a few weeks, and I'm finding all kinds of stuff. I'm also throwing out a lot of stuff, so that's the good part. I just need a whole lot of extra days between now and then.
In my non-blogged about cooking over the last few weeks, I seem to have been eating a lot of "Mexican" type foods. Partially because I bought two packages of tortillas that I was determined to use instead of throw away, and partially because it's generally a pretty easy meal one way or another. So it's fairly amusing that the clipping I found has a headline "Ravioli goes south of border". This one, for once, is not from the Hartford Courant, it's from the Richmond Times-Disgrace, Sunday October 19, 2003, a column called "Desperation Dinners".
And what I'll desparately be making this weekend is ...
Tex-Mex Mini Ravioli Soup
Here are the ingredients:
1 teaspoon vegetable oil
1 large onion (for about 1 cup chopped)
2 (14 1/2 ounce) cans fat-free chicken broth
1 cup bottled salsa, mild or hot
1 cup frozen corn kernels
1 9 ounce package refrigerated cheese mini ravioli
1 15 ounce can black beans
reduced-fat sour cream, optional garnish.
Serves 4. "Start to finish: 20 minutes".
Monday, June 25, 2012
Experiment 22 - 24-Hour Omelet
Ingredients list
This is not actually an omelet. I believe technically it is a type of strata.

A few things to notice about my ingredients - I used skim milk, because I don't ever have whole milk in the house. I used the "Mexican blend" shredded cheese that I had on hand, because hey, why not? And if you look close you'll see the bag of mustard seeds there. I don't have any dry mustard, but I have the seeds and the infamous "motar" and pestle, so it's all good.


Scatter half the bread and half the cheese into the baking dish. Then do it again with the other half of the bread and the cheese. Whisk together the rest of the ingredients,

and pour over the bread. Press down on the bread to help it soak up the egg mixture, then cover the dish with plastic wrap and stick it into the refrigerator for at least eight hours, up to 24 (see also: name of recipe).

When it's time to cook, just stick it into a 350 degree oven for an hour.
Mine came out a little well-done. I think that's a combination of using a dish that was too big and having an oven that's not well-calibrated.

Verdict - meh. Maybe if I had used the proper sized baking dish, it would have been better. As it was, this just seemed like eggs and toast, all mixed together. If I wanted a breakfast bowl, I'd go to Bob Evans. Which reminds me, I had bought sausage to have with this, and I completely forgot to cook it. D'oh!
Lessons Learned - pay attention to the instructions on the size of the baking dish!.
Tools needed - I really need some measuring spoons that can help me with the 1/8 and 1/4 tsp measures that many of these recipes have called for.
Skills needed - nothing at all.
Wednesday, June 20, 2012
Experiment 22 - The Selection
Another break in the action, courtesy of good weather and an attempt to have one of those things, ummmm, a "social life" I think it's called. I'm not going to go nuts trying to do too many things in a week, and cooking is, for better or worse, lower on the priority list than some other things. I'll see how the summer goes. I'll post as often as I can, that's all I can say.
For this week I decided to search through a great cookbook I'd gotten for Christmas - Cooking for Two, 2010 from America's Test Kitchen. I searched the ATK site for a copy of the recipe that I could link to, but didn't even find their "full-size" version of the recipe. There are other sites out there that seem to have no qualms with posting verbatim copies of ATK's work, but we don't do that here. I might have trouble keeping up with the schedule I initially set up for myself, but one thing I won't compromise on is my avoidance of copyright issues.
So I was flipping through this cookbook and landed in the breakfast section. I got tempted by a recipe for a 24-Hour "Omelet". The quotes are because this isn't really an omelet as you'd normally think of one. More details on that in the next post. One advantage to this one is that the prep work is done the night before the cooking, and even though I'll be using the oven, it will be early in the day, before the heat gets too crazy. (First day of summer here and suddenly the temperature hit 98 F)
24-Hour "Omelet"
1 tablespoon unsalted butter, softened
2 slices high-quality white sandwich bread
3 ounces cheddar cheese, shredded (about 3/4 cup)
3/4 cup whole milk
2 large eggs
1/4 cup grated onion
1/4 teaspoon salt
1/4 teaspoon dry mustard
1/8 teaspoon pepper
1/8 teaspoon hot sauce
I will not even have to shop for this, I have everything I need on hand.
Tuesday, June 5, 2012
Experiment 21 - Irish Whiskey Cake with Dark Chocolate
Ingredients list
A few years ago, I spent most of the spring and summer unemployed, but still getting paid, thanks to a relatively decent severance package. An intelligent, frugal person would have saved every extra penny during that time. Me, I bought things from eBay and Amazon, including a refurbished KitchenAid stand mixer. The reason I mention that is that I got to use my mixer for this week's recipe; I haven't used it much since that summer of leisure, I guess I was just preparing for the time I'd start a recipe blog and randomly choose a recipe that called for it.
I usually don't just copy and paste the instructions, due to possible copyright issues, but I'm going to go out on a limb here. I can't find anything with this exact recipe name in my searches, so I hope there's no problem. I'm surely not making any money from this. And I did throw in a couple photos and notes in between the steps.
But first, here are all the ingredients --

Directions:
0. Preheat your oven to 350°
1. Butter and flour a bundt cake pan
I used some Pam made for baking, that has both the oily stuff and the flour, because I'm lazy like that.
2. In a bowl, stir together flour, salt, and baking powder.
3. In a separate bowl, stir together whiskey, oil, and milk. Set bowls aside.
Since you've got the whiskey bottle open anyway, now would be a good time to have a wee glass o' the good stuff.
4. In a stand mixer, using paddle attachment, beat butter until smooth.
According to the label, one stick of butter is 113 grams. Since the recipe called for 110g, I got crazy and used the whole stick.
5. Add sugar and vanilla and beat well.
Measuring the vanilla is the only time I had to check online for a conversion. Turns out that 10 ml is just a tad over 2 teaspoons.
6. Add eggs and egg whites 1 at a time, beating after each addition.
7. Add liquid and dry alternately to butter mixture stirring just to incorporate.
8. Gently stir chocolate through batter.
9. Pour finished batter into prepared pan

(I took this photo mostly so you could see how much of a mess I generally make when doing these recipes)
and bake in a preheated 350° oven 45-55 minutes or until a toothpick inserted in the cake comes out clean or with just a few crumbs
10. Remove from pan to cooling rack and cool completely.
Completely? But it smells so good, and warm cake is yummy.


Verdict: Oh my, yes. Now bear in mind, this is not a "chocolate" cake. This is a cake with small bits of chocolate in it. And it's very very good.
Lessons Learned - nothing new this week.
Tools needed - I didn't have to buy anything this week, as I'd bought the KitchenAid mixer several years ago, just for this moment.
Skills needed - nothing new this week, although I used my relatively new skill of egg separating that I taught myself several recipes ago.
Wednesday, May 30, 2012
Experiment 21 - The Selection
Instead of reaching into the big box of recipes this week, I picked a file from one of the many disks I have files on. Packrattery by electronics still is a terrible thing.
I did make a tasty chocolate pie not all that long ago, but the recipe I chose sounded really good to me. I also liked the measurements being all presented in metric. I don't know how useful that will make it to anybody else who might stumble upon this blog and try to make the recipe. If possible, I'll try to jot down the conversions as I go when I prepare this on Saturday or Sunday. I also liked that the actual preparation calls for using my stand mixer, but let's not get ahead of things!
Irish Whiskey Cake with Dark Chocolate
Ingredients:
340 g all-purpose flour
5 g salt
15 g baking powder
110 g unsalted butter
365 g sugar
10 ml vanilla
3 eggs
2 egg whites
100 ml Irish whiskey (Jameson recommended)
80 ml canola oil
125 ml milk
50 g good quality chopped chocolate
Tuesday, May 29, 2012
Experiment 20 - Veal Francaise
Ingredients list
Hey, welcome back, hope you enjoyed your long holiday weekend. I traveled to Virginia Beach and rode my bicycle up and down the boardwalk a couple of times, once without benefit of sunscreen, so I'm paying for that mistake. Once I got home Sunday evening, the chance to go have hot dogs* on the grill and drink beers with some friends was much more interesting to me than messing up the kitchen. I did go out and grab the lemon and a bottle of wine in order to have everything on hand, but I didn't make this until Monday evening. But hey, who else had Veal Francais for their Memorial Day cookout?

As noted previously, this was nearly identical to the Veal Piccata from week five, just subtract garlic and add eggs.
After taking the above picture, I squeezed the lemon for the required juice and measured out the wine. From there it was all straightforward. Combine the flour, salt and pepper in a bowl (or bag, they say). Pound the veal until very thin and dredge it in the flour mixture, then set aside. Beat the eggs in a separate bowl until frothy. Melt the butter in a large skillet using medium high heat. Then dunk the veal in the egg and place in the pan - don't overlap, and cook in batches as necessary. Cook until golden brown, turning once.
Place the veal on a warmed serving platter, then add the wine and lemon to the pan, scraping up the crunchy bits with a whisk or fork. Bring just to boiling then pour over the meat and serve.
I had mine with yellow rice, green beans, and red tomatoes.

Verdict: It was very good, but all in all, I'd rather have the veal piccata - garlic is always welcome, eggs, not so much. And capers, gosh darn it, capers.
Lessons Learned - nothing new this week.
Tools needed - nothing new this week.
Skills needed - nothing new this week.
*If you have a Trader Joe's nearby, I highly recommend the all beef uncured hot dogs. They're huge and tasty and have a crispy skin and are just all around wunderbar.
Thursday, May 24, 2012
Experiment 20 - The Selection
A funny thing happened on the way to this week's selection post. I lost the clipping. But I'd already purchased the meat ingredient, so I was just about ready to crack open the America's Test Kitchen cookbook I got for Christmas, but I decided to search around the house one more time, et voila
Veal Francaise
(although technically, I guess that should be Veau Français, but hey, I gotta post what's on my clipping)
1/2 pound veal scallops or chicken breasts, boned and skinned
1/4 cup flour
1 teaspoon salt
1/4 teaspoon pepper
3 eggs
1/4 cup butter
2 tablespoons dry white wine
1 tablespoon fresh-squeezed lemon juice
This one might be a lot like the Veal Piccata from experiment 5 --
I'll try to avoid the temptation to add capers, even though I think they're one of the best ingredients in the world.
Now, this being a holiday weekend, and me with plans to hit the beach for at least part of it, I might not get around to making this in a timely fashion. Sunday evening looks promising, but there are no guarantees. Please stand by.
Sunday, May 20, 2012
Experiment 19 - Won Tons
Ingredients list
Shopping was not too bad this week. For once the "product locator" kiosk at Martin's was actually helpful, and I found the won ton skins approximately where it said I would. On the previous experiment, searching for "evaporated milk" came back with no results. Searching instead for "carnation milk" worked. Srsly, Martin's? You make me miss Ukrop's on almost every shopping trip. Just sayin'....
Anyway, back to the shopping. The other thing I had trouble finding was ground pork. It was right there in the meat case, cleverly hidden in plain sight. Of course I had to buy a package of 1.25 pounds, when I only neeed 40% of that. Reminded me of my problem finding veal a few weeks back. My kingdom for a butcher shop. At the end of the day, though, I had everything I needed.

Prep work was pretty simple. I used my handy Kitchen Aid chopper to make quick work of both the scallions and the water chestnuts. (I'd almost purchased a can of sliced water chestnuts, but realized that figuring out how many slices make up one nut would have made it difficult to count to 8). With the chopped items chopped, creating the meat mixture was simple. Once again, my mis-en-place method was useful. With everyting laid out (I use those little ramekins for everything!)

Beat the egg, then mix everything else (except the skins of course) together.
My recipe calls for each skin to be cut into quarters. This resulted in teeny little squares. The skin recipe (below) says that you should make 3 1/2 inch squares. The store-bought skins I had were just a tad over 3 inches square. I really think that extra 1/2 inch would have made a big difference. But back to the main recipe. Into each quarter, place 1/2 to 1 TEAspoon of the mixture. Fold up the corners to meet and seal by pressing gently together. Wetting your fingertips here can help. I managed to make 24 tiny little won tons before I decided to use whole skins for the rest.

I have large hands and dealing with 3/4 inch squares of dough was just not working well for me. Also, I was only able to get a scant teaspoon full of meat into each of the tiny won tons. I have to say, dog bless Betty if she actually make 48 of those little suckers for each time she made this recipe. When I switched to full size skins, I used a tablespoon of meat mixture in each. In the end, I used 18 skins in total, 6 of them quartered, plus 12 more.

To cook the won tons, boil 4 quarts of water, then add the won tons. Return to a boil and cook for 5 minutes. Drain in a colander, and run cold water over them to cool. Once cooked, they can be frozen, or left in the fridge for a few days.
I honestly don't recall how these were served at the work get-togethers mentioned in the selection post. It was the 80s, what can I say? I chose to serve warm, with some Trader Joe's gyoza sauce.

The leftovers might be used for some soup later this week. There is also the matter of leftover ground pork, water chestnuts, scallions, and even wrappers. Perhaps some kind of "Chinese" meatballs? Who can say?
Verdict: Very tasty. I think the tiny ones were too small, and the giant ones were too big. Obviously, I need to figure out the Goldilocks size.
Lessons Learned - I usually write a shopping list based on the recipe. Maybe I should take the actual recipe with me - that would avoid potential mis-steps like the whole vs sliced water chestnut issue.
Tools needed - nothing new this week.
Skills needed - nothing new this week.
Won Ton Skin preparation:
Beat the eggs, then blend thoroughly with the flour and salt and knead until smooth. Cover with a wet paper towel and let stand 15 minutes. Knead again, then roll on a floured boared until paper thin, making sure board is well-dusted with flour. Cut into 5 to 6 dozen 3 1/2 inch squares. If these are notbe be used immediately, the may be stacked together, with each piece being well-floured. Wrap stack in foil and refrigerate. This can be kept for about a week. If squares befome hard or dry, re-moisten by wrapping them in a damp towel.
Thursday, May 17, 2012
Experiment 19 - The Selection
And . . . we're back. Yes, I took an unscheduled, unannounced week off. Things were getting rather discombobulated and I needed to take a moment to refocus. Also, last weekend I had multiple things going on outside the house, so the chances of making any specific recipe were pretty much non-existent.
At the place I worked back in the early 90s, we often had get-togethers outside of working hours. This was back in the days when sometimes you actually liked the people you worked with, and didn't mind seeing them socially. These events usually involved food, and one of the women I worked with, Betty, often would make this week's dish. I could have eaten every last piece, every single time. As with most of the recipes that I've kept stashed away for all these years, I've never before attempted to make these before. Hopefully they will be as good as I recall.
Won Tons
1 egg
1/2 lb ground pork
1 Tbsp chopped scallion
8 water chestnuts, chopped
1 tsp salt
1/8 tsp pepper
1/2 tsp sesame oil
1 tsp soy sauce
12 wonton skins
I think I actually have some sesame oil in the cabinet, although it's probably not any good. Everything else should be easy enough to find at the market. There is actually a recipe on the back of this piece of paper for the skins, but I'm going to go with store-bought this time, if that doesn't turn out to be a problem. Just in case, though, I'll list the ingredients:
2 cups flour
1 tsp salt
2 large eggs
Wednesday, May 9, 2012
Experiment 18 - Chocolate Stout Silk Pie aka Guinness Chocolate Pie
Ingredients list
I'm not going to make any excuses, I'll just report once again that spring time keeps me busy outside the house. Thus I didn't make this pie until Monday night, and it requires sitting in the refrigerator overnight, and then last night I went to see The Avengers, and by the time I got home, eating pie was in the cards, writing about it was not.

Simple prep, especially since I chose to use a pre-made crust crust. I even chose a chocolate crust instead of plain graham cracker, because that's how I roll.
Nevertheless, I'll go ahead and transcribe the first part. I'm not so concerned with any copyright issues on this one, since it came from email.
Preheat oven to 350. Add melted butter to crushed graham crackers and mix until well blended. Using fingers, press crust mixture into bottom and up the sides of a pie pan. Bake crust for about 6 minutes until set. (You can alternatively use a ready made graham cracker crust.)
[as I did]
For the filling....
Place chocolate, marshmallows and salt in a blender. Blend until well mixed and chocolate is finely ground.

I have to admit, this part caused some problems. I have mistreated my blender in many ways over the years, but it has always come through for me. I fear this was almost too much, as the chocolate caked up around the bottom and I smelled burning. I think a food processor would be the better appliance in this case. In any event, I used some spatulas and some knives to mix things up and got things mostly mixed up.
Moving on .... in two separate saucepans (in order to prevent curdling), heat stout and evaporated milk until very hot, but not boiling.
Pour stout and milk into blender and blenf for one minute. Add vanilla and creme de cacao and blend. Pour into the crust and refrigerate overnight.

The very hot liquids took care of melting both the chocolate and marshmallows, so despite the issues with the blender, everything worked out fine.
If you hadn't figured it out from before, the creme de cacao was the ingredient that I found a substitute for. SInce the recipe only calls for one tablespoon, I just couldn't see buying even the smallest bottle of CdC at the ABC store, so instead I chose to pick up a tiny bottle of Godiva chocolate liquer from the selection of miniatures. And I still have leftovers.

(Sorry about the grainy photos. The flash in my pocket size camera has died. It's been tossed around and dropped and performed really well for 8 years, so I can't complain too much. Next week I'll use my DSLR or phone.)
Verdict: It's GREEEEEAAAAAT. Maybe just a tad too sweet, if there is such a thing. Perhaps going with regular graham cracker crust instead of chocolate would help.
Lessons Learned - try to use the right appliance, despite what the recipe says.
Tools needed - nothing new this week.
Skills needed - nothing new this week.
Thursday, May 3, 2012
Experiment 18 - The Selection
Usually the general process for this here recipe blog thing is "select, post, shop, cook, post". Last night, however, I selected a recipe that included an ingredient that I wasn't sure if I could get in a reasonable quantity, so I went shopping first to check on that.
As I grow farther and farther away from the original "random" selection idea, I find it harder and harder to make a choice that sounds good on the night I do the selection and sounds like something I'll still be interested in by the time the weekend rolls around. Last night I was thinking "dessert" more than anything else, and finally stumbled upon a recipe that came to me in email. See if you can figure out which item caused me to shuffle up the process this week.
Chocolate Stout Silk Pie, aka Guinness Chocolate Pie
Crust -
1 1/2 cups crushed graham crackers
1/3 cup melted butter
Filling -
12 oz. semi-sweet or bitter-sweet chocolate (chocolate chips work well)
24 large marshmallows
pinch of salt
2/3 cups stout
1/3 cup evaporated milk
1 tsp vanilla
1 T creme de cacao (liquer, light or dark will work)
The body of the email this arrived with also states "some female co-workers of mine call this 'PMS Pie', on the basis that it pretty mush satisfies any chocolate craving." That's beyond my ken, so I'll leave it to others to judge. Just throwing it out there.
Wednesday, May 2, 2012
Experiment 17 - Swiss Chicken Cutlets and Swiss Vegetable Medley
Ingredients lists
Another late post. I've been busier than a hooker at a Secret Service convention. And today is officially selection day as well. I'll get to that later.
Shopping was pretty simple this (last?) week. I needed to pick up some chicken broth, cheese, sour cream and vegetables. Everything was where I expected to find it in the store for a change. Here is everything laid out, ready to start the prep.

Let's start with the Vegetable Medley, since that has to cook a bit longer. The hardest part was remembering to take the veggies out of the freezer and dump them into a colander for several hours to thaw and drain. I did have to shred the cheese, since I'd bought the giant hunk of cheese seen above. Once that was ready, everything got tossed into a bowl - with the exception of half the cheese and half the onion rings. The recipe should have stated "1 cup cheese, divided" and so on, but whatevs. I just dumped it all into the one quart glass casserole that I have and stirred it up with a wooden spoon to combine everything. This got covered and placed into a 350 degree oven for 30 minutes.
While that was cooking, I flattened the chicken thighs with my handy meat smasher tool (forgot to include that in any of the pictures). Then I sliced off some pieces of cheese and rolled up one slice of cheese in each piece of chicken, and tied it tightly with kitchen twine. The recipe says to combine the flour and pepper on a piece of waxed paper - I had some mixed up from something I had cooked earlier in the week, so I just used that.

I was then supposed to melt the butter in a large skillet in order to cook the chicken, but used olive oil. This was supposedly a "healthy" recipe, why use butter? And I couldn't skip sauteing up some onions and garlic in the skillet just before adding the chicken rolls. Good thing I did, but we'll get to that in a moment. The rolls were cooked over medium heat for about three minutes, turning frequently, until nice and golden. Then the broth, win and dried oregano were added - except I used additional broth instead of wine. The heat was brought up until the liquid was boiling, then dropped to medium-low to simmer for 10 to 12 minutes - until the chicken was well cooked and the sauce thickened a bit.
Soon after I got to the simmering step, the 30 minutes for the vegetables had elapsed. It was time to top the casserole with the remainder of the cheese and onion rings, and continue cooking for 5 more minutes.
This was one of those times when all the timing worked out well. I pulled the chicken from the pan and removed the string, then I pulled the vegetables from the oven. I had bought some more fresh herb plants, so I was able to go ahead and garnish with parsley and oregano sprigs as instructed.

Verdict: Let's face it, Swiss cheese isn't really known for its bold flavor. Both the chicken and the vegetables tasted OK, but they could have used a bit more. A little bit of oregano popped up in a few bites of the chicken, but it was not part of the dish, it was a "oh hey, I'm here too" sort of thing. Also, this is approximately how I've made chicken Cordon Bleu in the past (of course with ham in addition the cheese), so I'd just as soon make that anyway.
Lessons Learned - nothing new this week. Wasn't I supposed to be learning things with this whole experiment thing?
Tools needed - nothing new this week.
Skills needed - nothing new this week.
Thursday, April 26, 2012
Experiment 17 - The Selection
I came across two recipes this week that purport to be "Swiss" in some way. I'm pretty sure it's all about the cheese.
First up, we have one of those recipe cards, a sample from an outfit called "Healthy Meals in Minutes ™". I didn't subscribe, but what the heck, another addition to the recipe cache was always welcome. No idea when it might have come in the mail, but the fine print shows MCMXCIV, so that's 1994 if I'm not mistaken. Sometime after that, obviously. I'm going to guess 1996, which is about when I was getting those Southern Living recipe cards, and started getting solicitations from all the other companies that wanted to reel me in. The main dish this week will be:
Swiss Chicken Cutlets
- serves 4 -
2 thin slices reduced-fat Swiss cheese (about 2 ounces)
4 chicken cutlets (4 ounces each), 1/4 inch thick
2 tablespoons all-purpose flour
1/2 teaspoon black pepper
1 tablespoon unsalted butter or margarine
1/2 cup reduced-sodium chkcen broth
1/4 cup dry white wine or reduced-sodium chicken broth
1/4 teaspoon dried oregano
Chopped fresh parsley and fresh oregano sprigs for garnish
Kitchen twine and waxed paper will be required. The notes mention that you can use boneless breasts if cutlets aren't available. Just pound 'em flat. I'll use thighs, of course, since I have a bunch of them in the freezer. As far as the fresh herbs, I've discussed that - it's a waste to but the bundles they sell at the supermarket. Unless I have something growing in my herb garden that I can snip fresh, I'll use dried or go without.
As an accompaniment, I found a clipping which appears to have come from a Sunday newspaper coupon insert. On the back, there's a coupon that expired on 7/21/87, so that gives a basic time frame for the clipping. The ingredients in this one just laugh at the low-fat, low-sodium ingredients in the recipe above. I'll figure out how healthy I want to be when I go to the grocery store for ingredients.
Swiss Vegetable Medley
- Makes 6 servings -
1 bag (16 oz.) frozen broccoli, carrots and cauliflower combination, thawed and drained
1 can (10 3/4 oz.) condensed cream of mushroom soup
1 cup (4 oz.) shredded Swiss cheese
1/3 cup sour cream
1/3 teaspoon Durkee Ground Black Pepper
1 jar (4 0z.) chipped pimiento, drained (optional)
1 can (2.8 oz.) Durkee French Fried Onions
Well, I guess we know whose portion of the coupon insert this recipe was from. Not sure what options I'll have on the onions, but as far as the pepper goes, this is a Penzey's household, and there is plenty of pepper on hand.
There is a lot rain in the forecast for this weekend, so maybe, just maybe, I'll manage to make this on Saturday.
Sunday, April 22, 2012
Experiment 16 - Sweet & Sassy BBQ Chicken Pizza
Ingredients list
First, let's take a look at the ingredients.

Red onion - I swear, this thing looks like it's covered in purple wax. But as can be seen in the photo below, unless there were some very diligent growers applying wax to every layer of the onion as it grew, I guess it's natural. Nature is cool, eh?

BBQ sauce - just about every barbecue sauce on the shelf at the grocery store is a high-fructose corn syrup jubilee. I finally picked up a relatively expensive, not quite major market, type (don't even recall the brand name now), and then I wandered past the mark down section of the store. Lookee there, Bullseye BBQ sauce at half-price. I had to scratch and scratch to peel off the yellow markdown sticker so I could see the ingredients list, and finally could tell that it did not contain HFCS. I bought two bottles then, and went back later in the day to buy another bottle of "regular" and two of hickory flavor. So I'm all set with BBQ sauce for the summer, I think. On the other hand, I probably ought to hunt down a barbecue sauce recipe of my own.
Cheese - The only pre-shredded pepper jack cheese available was Sargento brand, which I won't buy because of their support of Wisconsin (hopefully soon to be ex-) Governer Scott Walker. So I bought a brick of the store brand. I have a mandoline and I'm not afraid to use it.
Chicken - I chose a non-Hormel brand which came in a 12.5 ounce can. Unit price-wise, it was still significantly cheaper than the name brands.
Pizza crust - suppose you were going to the grocery store and wanted to get one of those pre-made pizza crusts. Boboli is one brand name. Where would you look? I checked the bread/baked goods area. No dice. OK, then how about the aisle where they have the pasta sauce and such. Nope. Finally I stumbled upon the display at the end of the frozen food aisle. SRSLY? Who is merchandising this place? I guess it was close to the frozen pizzas, so maybe the idea was that you'd go looking for a Tombstone, see the Bobolis and say "hey wait! I could make a fresh pizza instead!" They did have some pepperoni and a couple types of jarred/canned sauces there, so I guess it almost kind of makes sense. Whatevs.
The preparation was super simple. Cook the sliced onion in the olive oil until caramelized. Pour the sauce onto the crust, then add the chicken, onions, and cheese. I might have used a lot more cheese than called for, but I'll never tell.

Cook it up in a 450 degree oven for 12 to 15 minutes, end Bob's your uncle.


Verdict: This was really good, and with a bit of tweaking, it could be great. I can hardly believe I'm about to type this, but maybe there was a bit too much barbecue sauce, because it was a bit hard to handle the slices. Also, if I work on finding a BBQ sauce recipe (as mentioned above), I'll have a bit more control on the amount of sugar. As hokey as the name of this recipe may be, it actually works - the sauce and the caramelized onions provide the sweetness, the pepper jack cheese give it sass. When I baked the pizza, I went with the low end of the 12 to 15 minute range, but I should have gone for the high end.
Lessons Learned - Obviously, this recipe did not teach me any new cooking skills. And while it might seem like an obvious recipe, sometimes I just need ideas to get me out of the rut of "things tossed into a skillet" (for $600, Alex). I will definitely make something like this again, and I can imagine using the pre-made crusts for other pizza styles as well.
Tools needed - nothing new this week.
Skills needed - nothing new this week.
Wednesday, April 18, 2012
Experiment 16 - The Selection
Hey Hey, look at me go, it's Wednesday and I'm posting my recipe selection. Of course, I have to work on Saturday, probably for more of the day than I care to think about, so there's little chance I'll make this until Sunday. On the other hand, this looks fairly simple and doesn't look like it will take a lot of time, so we'll see how that workday goes. Because after working all day, what would be better than ....
Sweet & Sassy BBQ Chicken Pizza
(hey look, I don't name these things, I just pick 'em out of the box)
1 can (10 oz) HORMEL ® Chunk Chicken, drained
1/2 red onion, sliced
1 T. CARAPELLI ® Premium Extra Virgin Olive Oil
3/4 c barbecue sauce
1 (12 in) prepared pizza crust
3/4 c shredded Pepper Jack cheese
OK, so obviously this is from an ad; it appears to be from a Sunday newspaper coupon section. I can not guarantee that I'll be using the name brands mentioned, that all depends on what is in my pantry and what is at the store. I'm kind of surprised that there's no brand name attached to the barbecue sauce. Guess I'm on my own for that one. I did just use up the last of my olive oil when making tonight's dinner, so I know I'll be buying that. Not sure if there's any canned chicken on hand, but even so, I'm thinking that 10 ounces spread over a 12 inch pizza crust might be skimpy (there's another adjective for the recipe name, eh?). Details on the shopping trip when I post the results.
Sunday, April 15, 2012
Experiment 15 - Chicken Cassoulet - The Results
Ingredients list

A couple things to note about my ingredients. For the chicken, I used boneless skinless thighs. They're my favorite, and cheaper than breasts. For the sausage, I used turkey keilbasa. As you can see, I used V8 instead of tomato juice, mostly because it was what I have on hand. And finally, rather than buying too many carrots and too much celery, I was happy to go ahead and buy the mirepoix at Trader Joe's. There was a little bit more than the recipe called for, but I used most of what was in the container and will use the rest to make something else this week.

This was pretty simple to put together. First up was the beans - rinsed and placed in a saucepan with enough water to cover by two inches. They were brought to a boil, the dropped to a simmer for ten minutes, then removed from the heat, covered, and left to sit for an hour.
In the meantime, I cut the keilbasa in half lengthwise, then cut it into one in chunks. I rinsed the chicken off and patted it try, the put it everything back in the fridge while the beans soaked.
When the beans were just about done, I put the mirepoix on the bottom of the crock pot, then put the chicken on top. I drained the beans and put them in a bowl with the sausage, spices, juice and Worcestershire sauce. I mixed it all up then poured on top of the chicken. Then came the really wasy part - turn the crock pot onto low and cook for 9 to 11 hours. (The recipe says you can cook on high for 5 1/2 to 6).

(time passes)

After a busy day outside, it was finally time for dinner. The recipe said to use a slotted spoon to remove the chicken and sausage. This was easier said than done, as my slotted spoon picked up plenty of beans, and a lot of the chicken was falling apart. As always, I did my best. The final step was to slightly mash the means.
Chicken, sausage and bean mixture were served up in a soup bowl. And I added a Trader Joe's multi-grain croissant, because it seemed like a good accompaniment.

Verdict: What I had was very good, but I don't think it was a true cassoulet (although I've never had one, I did my research). I did like the fact that there was no salt or pepper added to the recipe, and it didn't need any. I will probably go ahead and search out more authentic versions - either to make myself, or to have served to me in a small village in France.
Lessons Learned - nothing new this week.
Tools needed - nothing new this week.
Skills needed - nothing new this week.
Saturday, April 14, 2012
Experiment 15 - The Ingredients
I just didn't feel up to transcription last night, so here are the ingredients for this week's selection
Chicken Cassoulet
1 cup dry navy beans (7 to 8 ounces)
2 1/2 to 3 pounds meaty chicken pieces (breasts, thighs, and/or drumsticks)
1/2 pound cooked Polish sausage
1 cup tomato juice
1 tablespoon Worcestershire sauce
1 teaspoon instant beef or chicken bouillon granules
1/2 teaspoon dried basil, crushed
1/2 teaspoon dried oregano, crushed
1/2 cup chopped carrot
1/2 cup chopped celery
1/2 cup chopped onion (1 medium)
This will be going in the Crock Pot, so I can prep in the morning, do my outside chores, and then 8 hours later, dinner will be ready. But all that will happen tomorrow.
Friday, April 13, 2012
Experiment 15 - The Selection (more or less)
After last week's delayed preparation, an' all that, I'm nearly completely discombobulated.

I grabbed a small Better Homes and Gardens cookbook - more of a pamphlet really - and settled on a cassoulet recipe. Yeah, a whole lot less random than the original brief for this blog. Yet that's what it's going to take if I'm to continue, so I'm OK with that. It looks like it won't take so much away from my outdoor time, which is kind of precious at this time of year. It'll be hotter 'n' Hades soon enough, but while it's not, I have to do what I can out there.
I'll post the ingredients list early tomorrow.
Wednesday, April 11, 2012
Experiment 14 - Carne Asada - The Results
Ingredients list
I was well on my way to actually making this last night (Tuesday), but I got a phone call that required me to leave the house for several hours. I ended up eating a Big Mac for dinner. The best laid mice, or something like that.
Tonight was the night though. I got everything laid out and ready to go. The recipes as written were not very specific on what kind of peppers to use for the sauce and the Cebolla con Rajas, so I bought some jalapenos for the former and a poblano for the later. For the cilantro issue, I happened to be in a small garden shop the other day, so I went ahead and bought a live cilantro plant. That had more than enough "sprigs" for me to use, plus I can put it in the garden outside and have some ready for the next time. It certainly didn't cost any more than an oversized bundle from the grocery store, most of which would have gone to waste, so I think that worked out well.

First up was the sauce. I started a large pot of salted water to boil, then peeled the papery husks off the tomatillos and washed them. When the water was boiling, I dumped in the tomatillos and let them cook for 10 minutes. The directions state specifically to cook "until easily pierced by a fork." In the meantime, I used my kitchen shears to cut my sprigs of cilantro, got two garlic cloves peeled and ready, and I opened up one of the jalapeno to remove the seeds and veins. I decided that one would be enough, so I put the other one aside.
I also had time to cut two limes in half and juice them, for use with the steak. I also cut the steak into thin slices, across the grain. These slices were then pounded a bit and set aside.
Once the tomatillos were done, I put them in my colander which was placed over a large bowl, and smushed 'em up good so as to remove the skins and get the rest to flow down into the bowl. I hope it was OK to include the seeds. When I had gotten as much juice as I could, I put the skins aside and put the juice, cilantro, jalapeno and garlic into the blender and pureed it until smooth. In a saucepan, I melted some shortening (the recipe said lard, but I'm not down with that), then tossed in the puree. When it was heated, I added the water and salt. And here was this week's oops. I was halving the recipe, but I forgot and used a full cup of water. So I had to let everything cook down for a nice long time, instead of the 10 minutes called for.
No rest for the wicked with this set of recipes. With the sauce doing it's thing, it was time to "sprinkle" the meat with lime juice and salt liberally. Yeah, right, sprinkle. I got out my Tupperware marinader, put the sliced steak in there and dumped all the lime juice on top. Then I used the sea salt grinder I'd gotten for the soft pretzels from a couple weeks ago and let loose. I put the top on the marinader and gave everything a good shake. I continued to give the container a good shake every 10 minutes or so while I waited for the sauce to cook down.
This gave me some time to get the onions and pepper ready for the Cebolla con Rajas. I cut the poblano into strips (oops, I was supposed to peel it), and attempted to make something like rings from one of the large onions. That didn't work out too well - the onion was so large that there were two inner cores, so to speak. I just cut up as much as I thought I'd need and figured it would all come out in the fry pan.
Things were reaching critical mass now. I had one fry pan with a bit of olive oil in it to saute the onions and peppers (again, skipping the lard, and even the shortening this time). I had another with a small bit of oil in it to soften up the tortillas for the enchiladas (we're getting to that), and I had the sauce on a third burner.
I turned on the oven to 375. Then I heated up the pan for the CcR and got that going. Then I heated the pan for the tortillas. The process went like this - toss a tortilla in the pan to soften up. Bathe it in green sauce. Fill it with diced onion (did I mention dicing the onions yet? Yeah, that happened somewhere along the way) Fold up and place seam side down in a baking dish. There were three tortillas to take care of. Once these were ready, they got topped with more sauce and the parmesan cheese. I had a handful of colby-jack in the fridge, so I tossed that on, as well, because who ever heard of enchiladas made with Parmesan, anyway?
Into the oven for a bit - "until the cheese is melted". Finally it was time to cook up the steak. The directions called for it to be broiled for a minute or two on each side, but I re-used the CcR pan instead. See below.
And then suddenly, everything was ready. I pulled the enchiladas from the oven and placed a couple on my plate. I drained some of the carne on paper towels and then moved it to the plate. In between, I placed the Cebolla con Rajas, and on the side of the plate, a spoonful of guacamole.

Oh, OK, I couldn't go without a drizzle of salsa for some color.

Verdict:
I'm am nearly positive that I've never had an enchilada stuffed with nothing but onions, but here they were. ANd they were really good. On the other hand, this whole meal had a whole lot of onions. The carne itself was fantastic. As a meal, it all went together really well.
On the other hand, in the end, I think making all of this stuff at the same time would have been ambitious even on a weekend day. I really think that this full slate of recipes would require a commercial kitchen. Here I am with the enchiladas in the oven, but the carne is supposed to be broiled. Yeah, maybe if I had a salamander. But I just have the basic suburban kitchen with an electric range. As noted, I used a hot cast iron skillet for the carne and that worked out well enough.
I'll definitely make some carne asada again. The whole sauce, enchiladas, and so on? Yeah, not so much.
Lessons Learned - nothing new this week.
Tools needed - nothing new this week.
Skills needed - I think I know about cutting meat "against the grain" now. I'll have to get a professional opinion.
Monday, April 9, 2012
Experiment 14 - The Postponement
A funny thing happened on the way to the Carne Asada. It wasn't an ingredients issue - I was able to get the tomatillos I need. Well, two pounds of them, anyway, but that works for halving the recipe. I think I ended up with only 1.96 pounds, but that was nearly everything that the store had.
No, it was springtime. Springtime happened. After spending hours outside working on the yard on Sunday, the thought of spending another couple hours on my feet prepping the sauce and everything else just wasn't in the cards. And today being a work day and having other chores lined up used up my available time.
Granted, I have the tomatillos and other produce, so I'm going to have to make this stuff tomorrow. Wednesday at the latest.
In the meantime, here is a brief story to entertain you. Many years ago, when I still lived in Connecticut, I was out to dinner with my friend Barry at a Mexican restaurant called Jasper's. I believe it was located on Capitol Avenue at the time, although it later moved downtown to Union Place, in the location that had been Mad Murphy's. But I digress. After we'd eaten our meal, I excused myself to go to the men's room. When I came back to the table, Barry had ordered coffee for both of us. Up until that moment, I had never been a coffee drinker, at all, ever. It smelled pretty good, though, so I figured I'd give it a try. I thought it was great, and wondered why I'd been drinking tea all those years. I was immediately hooked, and have been drinking coffee ever since, although at first I couldn't figure out why what I was drinking didn't taste quite the same. The twist was that what I'd had at Jasper's was "Mexican Coffee." Nothing alcoholic, but with lots of brown sugar and cinnamon. I still make it that way for myself once in a while. Although as of this writing, my coffee maker isn't working, so there's another thing to deal with.
Anyway, Carne Asada coming up within 48 hours. Please stand by.
Friday, April 6, 2012
Experiment 14 - The Selection
I actually picked this clipping out on Wednesday, so I have no good excuse for not posting until Friday evening. I blame robot aliens from the mysterious future.
I ended up with another clipping of "The Butcher", but this one isn't dated. The column itself talks about San Francisco in the 1950's, and specifically, the Papagayo Room at the Fairmont Hotel. Merle Ellis talks about customers (from prostitutes to celebrities), the owners, and the parrots what were free to fly around the restaurant. The recipes in the column are taken from a cookbook that was published by the owners and available from Amazon for prices ranging from $40 to over $500. I think I'll stick with the four recipes that I have in this clipping for now.
And speaking of four recipes, this week is going to involve making all of them, since they all go together.
1) Carne Asada
2 pounds boneless top sirloin in one piece
juice of 3 limes or lemons
Salt
This is meant to be served with guacamole, Enchilada Verde (see #2 below) and Cebolla con Rajas (see #4 below).
2) Enchilada Verde for Carne Asada
6 Tortillas
2 cups onion, finely diced
1/2 cup grated Parmesan cheese
2 cups Salsa Verde (see #3 below)
Oil for frying tortillas
3) Salsa Verde
4 pounds tomatillos or 4 12-ounce cans tomatillos
2 or 3 small green chiles
3 cloves garlic
8 sprigs cilantro
2 tablespoons lard or shortening
1 cup water
1 teaspoon salt
4) Cebolla con Rajas (Green chile and onion strips)
2 large onions, cut in rings
1/2 cup peeled long green chilis cut in strips (rajas)
1 tablespoon lard or vegetable oil
I will definitely be trying to halve this recipe, 2 pounds of beef is a bit much.
I believe I'll start with the Salsa Verde, since that will need to be ready in order to make the Enchiladas. There is also a note that it freezes well, so maybe I'll consider making the full batch of that.
The tomatillos might be a challenge to find, which might make this whole experiment a bust from the git-go. We'll see. Tom Leonard's, Trader Joe's, Whole Foods ... ? There are some bodegas around, also, which I guess should be the first places I check. On the cilantro, as noted a couple weeks ago, I'll most likely use something dried, although I don't know the "sprig to tablespoon" conversion factor. Unfortunately, I don't expect to have any parrots flying around the house this weekend.

Monday, April 2, 2012
Experiment 13 - Stuffed Steak Florentine - The Results
Ingredients list
I'll just go ahead and mention that my weekend started out OK and went rapidly downhill. By noon on Saturday, I was ready to throw in the towel on everything. I did manage to get to the store and pick up the required steak and other ingredients by late afternoon, but actually taking the time to follow a recipe after that? That was most definitely not in the cards.
The steak I picked up was labeled as a "London Broil" and also said it was top round, so I was good to go there. I never actually measured the thickness, but I think I got at least the 1 1/2 inch lower limit. Nothing else in the ingredients list was out of the ordinary.

Although I'm getting a bit ahead of myself, the instructions did call for using a boning knife to cut a pocket in the steak. The knife I used is in the picture above. Is that a boning knife? I don't have the foggiest idea. But let's start at the very beginning. I hear it's a very good place to start. Actually, upon review, I see tht cutting a pocket in the steak is the very beginning. Mr. Ellis said to make a small cut with a boning kinfe "in the center of the side without the fat cover" and then to pivot the knife around to make a pocket. I think I did OK, although the stuffing part did cause a little problem. But we'll get to that.
Once the cutting was done, I sauted the spinach and green onions in the olive oil "until softened", then added the sour cream, dill, egg, cheese, salt and pepper. I immediately took it off the heat to cool a bit.
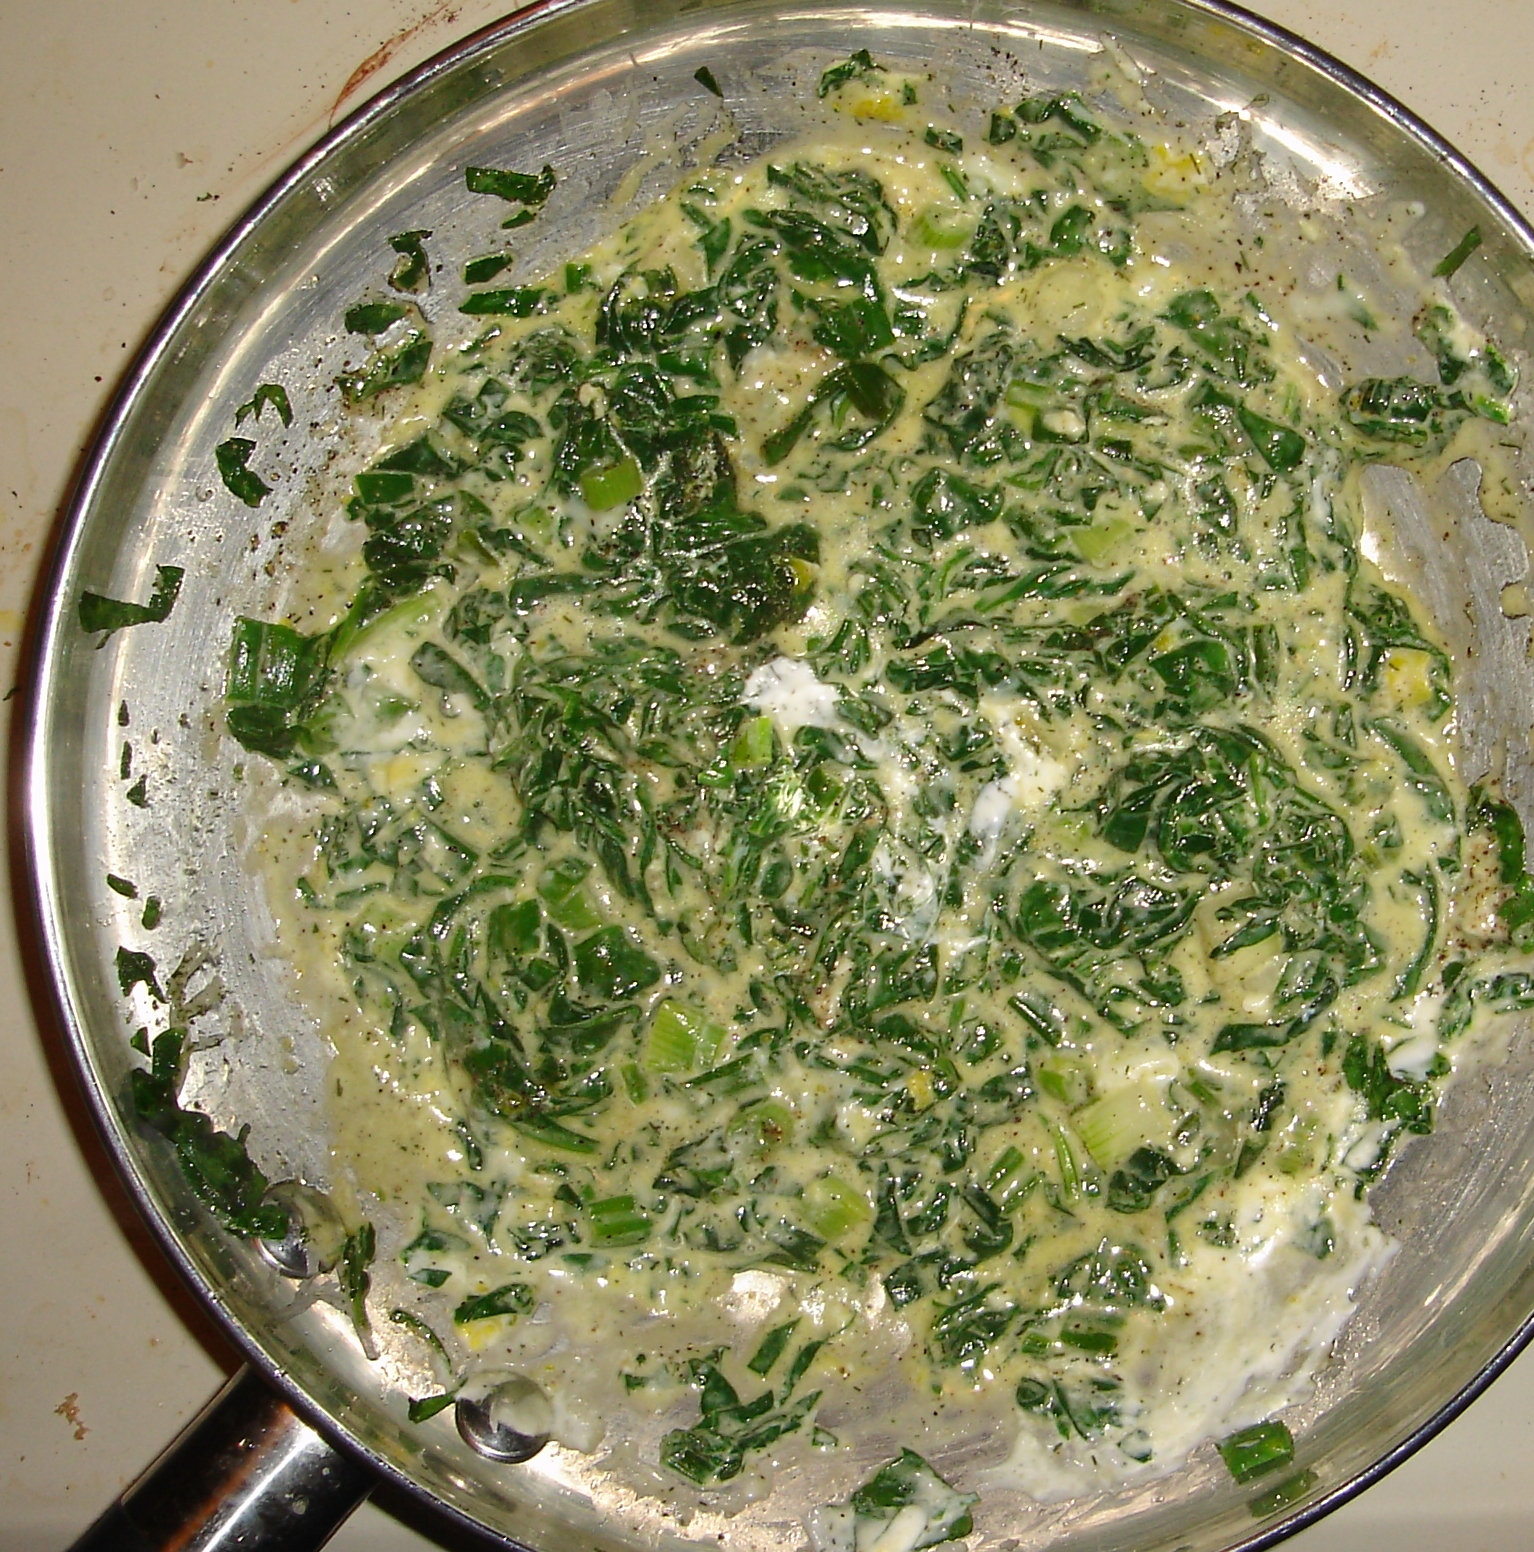
After a few minutes, I started to spoon the stuffing into the previously prepared pocket. As you can see below, there seemed to be more stuffing than pocket, but I did what I could. The next fun part was tying everything up with toothpicks and twine. There's a line drawing in my clipping that looks a lot better than what I ened up with, but I seemed to have a fairly well-tied package (not shown).

This got tossed under the broiler for a while, turning occasionally until cooked to the desired lever - "10 to 12 minutes for medium rare"
Here is the cooked result.

I served it with a loaded baked potato (except the chives haven't come up yet, so those were missing). At about 7 o'clock on the plate you can see a spoonful of sauted mushrooms and onion. Since the theme of the article was adding flavor to steaks, I thought I'd add some help of my own.
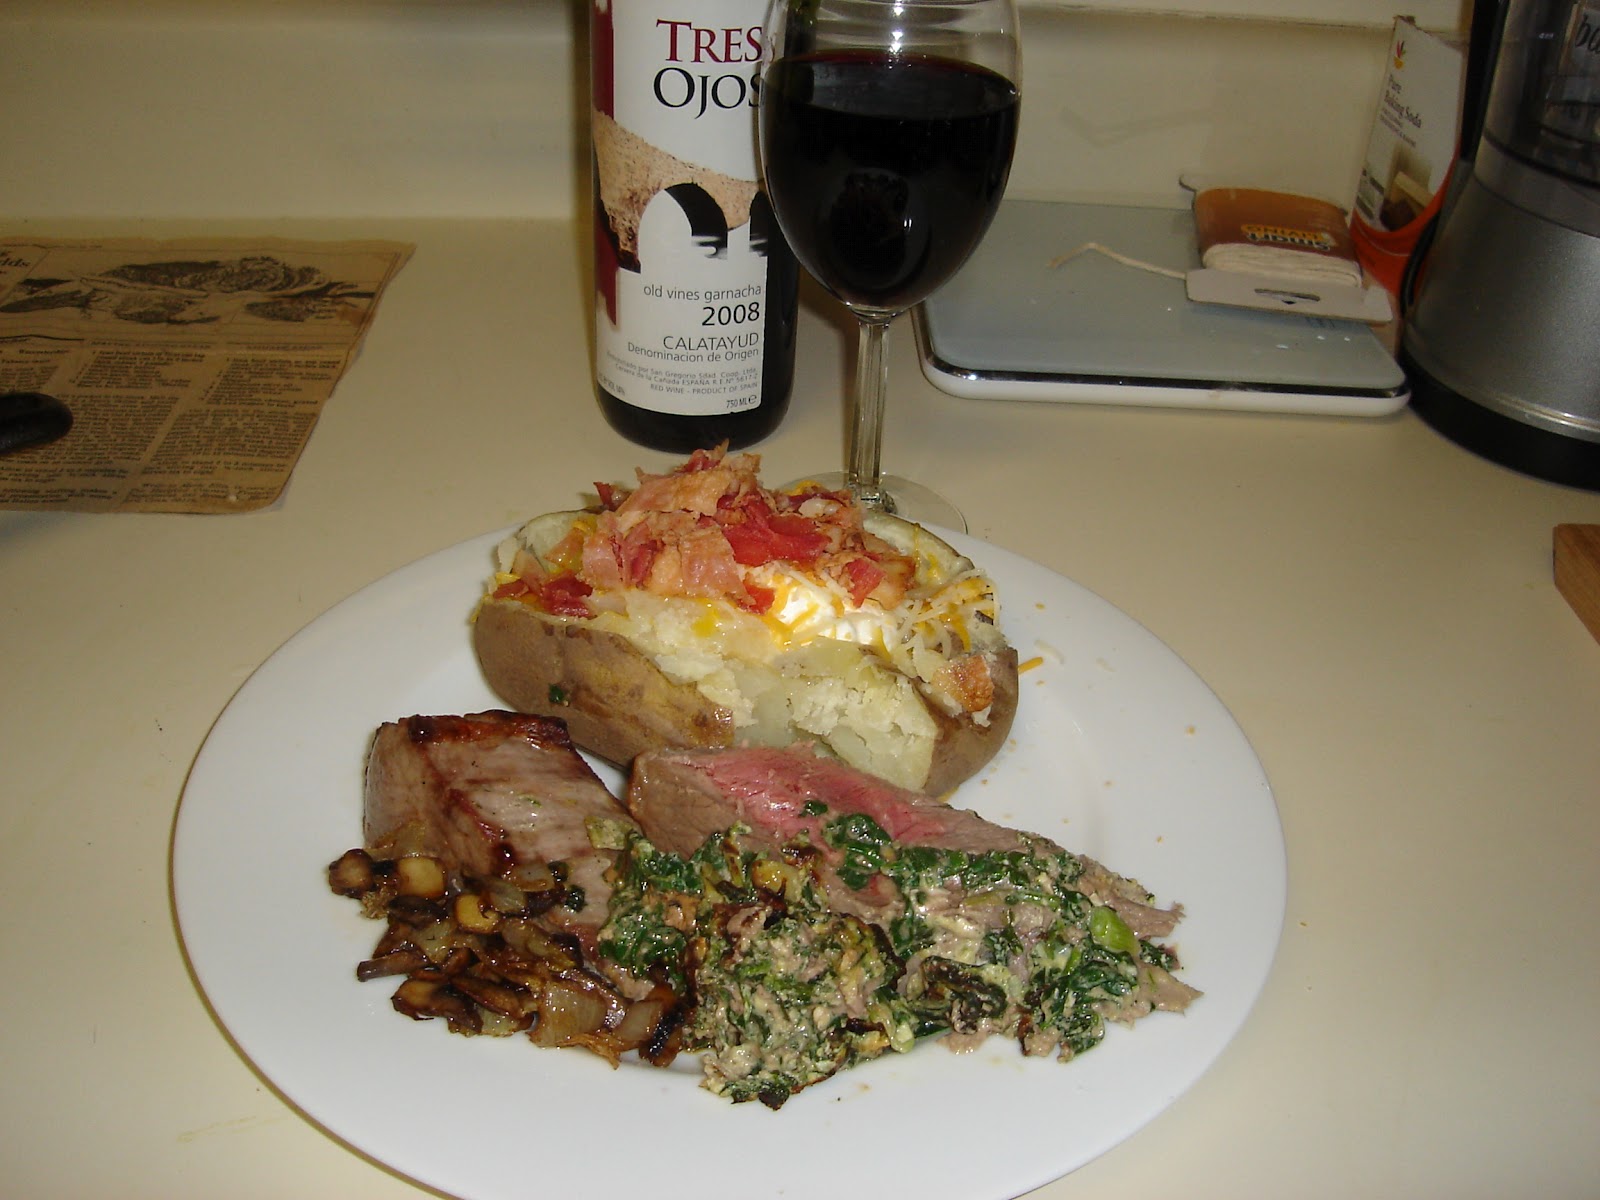
Verdict: I liked the stuffing, but I still ended up tossing a bit of Pick-A-Peppa sauce (it's like A-1, but a billion times better) onto the steak. I'd probably just go ahead and buy a better cut of meat in most cases.
Lessons Learned - nothing new this week.
Tools needed - nothing specifically, although I need to study up on my knives so I know the names of what I have. Maybe that's a lesson learned, not a tool needed.
Skills needed - nothing new this week.
Thursday, March 29, 2012
Experiment 13 - The Selection
This week's dip into the box brought up a clipping from one of my favorite newspaper columns of yore - The Butcher, written my Merle Ellis. I used to love reading this column every week, although I never did anything but read and perhaps clip it out for future reference. I guess this is the future, then. This one is from Wednesday, June 25, 1986 and is entitled "Stuffing Steak Adds To Flavor". The problem is that there are three recipes in this one clipping. I'd flip a coin, but I don't have any that are three sided. The easier thing to do would be to check the ingredients a little closer. "Carpetbag steak" include oysters. OK, that's out. "Maytag Stuffed Steak" calls for blue cheese. Not my cup of tea. OK then, I guess that wasn't really a problem at all. Number three it is ....
Stuffed Steak Florentine
1 lean beef sirloin or top round steak cut 1 1/2 to 2 inches thick (about 2 pounds)
4 cups chopped spinach leaves
4 green onions, tops included, chopped
1 tablespoon olive oil
2 tablespoons sour cream
1/4 teaspoon dill weed
1 egg, beaten
1/2 cup Parmesan cheese, grated
Salt and pepper to taste
This will also require toothpicks and string, and should serve six to eight.
Sunday, March 25, 2012
Experiment 12 - Scallops Mornay - The Results
Ingredients list
As should be obvious from all my posts referencing the Hartford Courant, I lived in Connecticut for quite a long time. When I think of "scallops", my first thought is little, sweet, bay scallops. I don't know if those are just generally not available here in Virginia, or what the deal is. The recipe didn't state which type specifically, but I am almost sure they would have meant bay. Be that as it may, I went to a local specialty seafood store and ended up buying sea scallops. I also got a bit of a lesson on sea scallops vs bay scallops, and on dry pack vs wet pack. It was interesting, but too much to go into here. At the end of the day (to coin a cliche), I paid $10 for half a pound of dry pack sea scallops. These recipe experiments can be expensive!
Although this will sound contradictory, the preparation was simple, but complicated. Simple in that there were no fancy techniques, but complicated because there was a lot going on.
Let's start ...

While I was reducing the scallop stock (so to speak), in another saucepan, I melted the butter and sauted the onions. I went off-script and added a bit of minced garlic, because who doesn't like some garlic? When the onions were tender (or in my case, browned a bit), I added the flour, milk and reduced liquid. Stirred and cooked until it was thickened and bubbly, then tossed in the cheese and continued to stir until that melted. I was then supposed to add salt and pepper if needed. The salt was fine (see below), but I don't mind a little more pepper, ever, so I added some.
The sauce then came off the heat and the scallops and mushrooms got added back in. The recipe then called for everything to be poured into two 8 to 10 oz individual casseroles. I don't have any such thing, so I used a ceramic quiche dish, which turned out to be just the right size. This got tossed into a 375 oven for 20 minutes.
In the meantime, I cooked up some yellow rice and made a salad. When the main dish was done, I took it from the oven and sprinkled with the chopped parsley.
et voila -


Verdict: A little salty. Although maybe that's in the whole bay vs sea thing. Also, I imagine that the official version of this dish might not be so "tan" looking. This is probably due to a few things - I didn't use "white pepper", since I don't have any on hand, and while I'm sure there may be a subtle taste difference, my cabinets are overflowing with spices as it is. I also cooked the onions until they were browned, which wasn't really called for. But this recipe is definitely a keeper, it tasted really good, saltiness be damned. I might add a touch more cheese, but I don't think it's supposed to be a really cheesy sauce.
Lessons Learned - While fresh ingredients are the preferable choice in most cases, the frugal person in me has a problem with the wastefulness inherent in fixed size packages available in the supermarkets. I bought a "bundle" of fresh parsley and a package of sliced mushrooms this week. Here is what is leftover -

I might eat a few things this week that would look nice with a parsley garnish, and I guess I could make something that calls for mushrooms. But that's 7.1 ounces of parsley! (Yes, I weighed it). Maybe with the warmer weather, I'll be able to visit some farm markets and get more appropriate sizes. Alternately, I will not be afraid to go ahead and use dried herbs, or canned/jarred vegetables, for future recipes. Fresh
Tools needed - nothing new. I don't need to fill up my cabinets with "individual casserole dishes" that would only get used once in a blue moon.
Skills needed - nothing new this week.
Subscribe to:
Posts (Atom)